
Pinky Street
Pinky:st Series 1 & 1APinky:st Series 1B & 2B
Pinky:st Series 2 & 2A
Pinky:st Series 3 & 3A
Pinky:st Series 4 & 4A
Pinky:st Series 5 & 5A
Pinky:st Series 6
Pinky:st Series 7
Pinky:st Series 8
Pinky:st Series 9
Pinky:cos Rei & Asuka
Pinky:cos Animate
Go! Go! Pinky Street!
Acchi Kocchi Pinky:ska
Arcueid Pinky
Pinky:st. in Town
Pinky: Show Time!
Pinky Super Lovers
Wonder Festival Pinky
Gunslinger Girl
Space Invaders
GoFa Party Pinky
Pentax Cameras
*istDS*istDS2
*istDL
*istDL2
K10D/20D
K100/200D
K2000/K-m
K-x
Optio A10/20/30/40
Pentax Lenses
SMC-DA 40 f/2.8 LESMC-A 50 f/1.4
SMC-A 24 f/2.8
FA 43mm f/1.9 Limited
DA 21mm F3.2AL Limited
FA 31/1.8 AL ED Limited
FA F1.8 77mm Limited
Other Lenses
Zenitar 16mm f/2.8 FEPeleng 8mm f/3.5 FE
Stuff
Refconverter-A
![]()
![]()
![]()
![]()
![]()
![]()

MacTidingsNU » Pinky & Pentax » Koroko Shoe Project
Updated 07-08-19
Email:
Pinky Projects
The Koroko Shoes
The Sitting Legs
Get the shoes in the shop!
Coming Up
Series 11
Koroko Shoe Project
After Pinky (and Pentax), Crocs were the most wonderful things in my life during 2006 so it is only natural that I wanted to make some of those great shoes for my girls too. Thus began what became a long labor of love, that is not quite finished, I think.
Already from the start I planned to build the shoes on Arc’s naked feet so my first task became to clone her legs and feet. Since I had some experience of Fimo (or Cernit) clay, and also had some of this material in my stores, it was only natural to use this for modeling the legs and shoes.
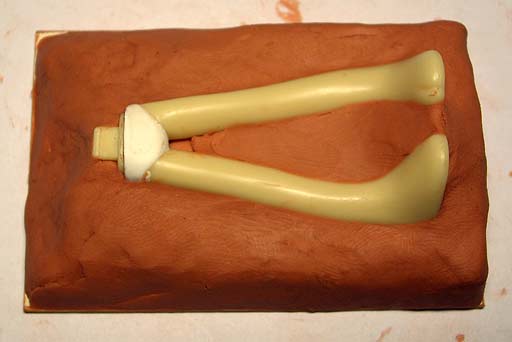
Like most Pinky parts the legs curve, making it impossible to cast a simple flat mold around them, they have to be embedded in clay that follows the shape of the original before a silicon mold can be casted around this. Luckily, I already had a supply of Silkaform, a reddish clay to use for this purpose. This is a very nice material to work with that won't stick to the silicon mold.
After placing a suitable lump of clay on a piece of cardboard, I pushed Arc's legs into the clay and started to build up the clay around the legs.
First lessons:
* Make the mold large enough, reserve at least 1 cm (0.5 inch) all around the model.
* A firm base for the soft clay is absolutely necessary, this will also determine the outline of the final mold.
* If pushing the original into the clay, make sure you don't bend or twist it. This is quite easily done with the flexible Pinky parts! Make a note of how the feet relate to each other before embedding them in the clay, for example.
* Before you hide parts of the original in the clay, consider drawing a line along the sides where the mold halves should separate. It might be possible to use masking tape if you don't want to deface the original Pinky part.
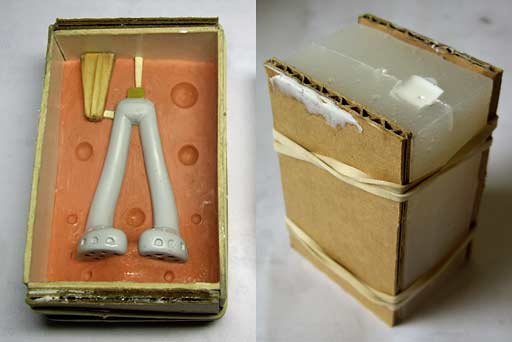
Here are some images of the clay bed with the legs and the finished form with a cardboard frame. For the next project I will use LEGO blocks for the form, as suggested by Tsuki!
I will spare you the terrible tale of my first silicon mold trials, although these did produce a poor copy of the legs that I baked and then tried to model a pair of shoes on. The result did not look good.
This resulted in some more lessons though:
* It is difficult to see details in a white clay model.
* Use contrasting colors of clay when adding new features to the model.
* Wash your hands frequently when working with the clay (or use gloves), otherwise the clay will become smudged.
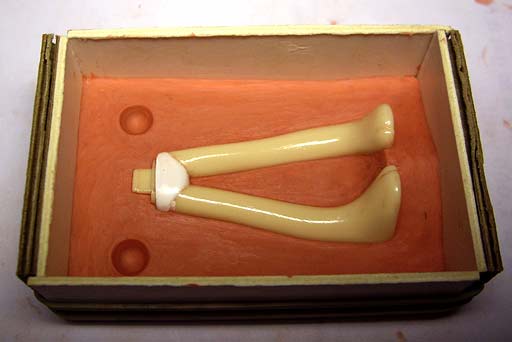
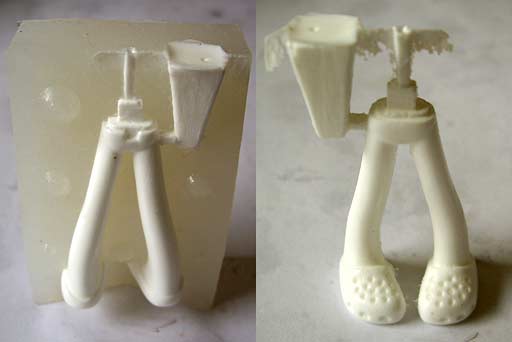
I next turned to plaster which highlighted the importance of getting the separating lines of the mold correct, plaster is obviously inflexible and will not let go of the original if not properly shaped. In the end I managed to make a plaster mold that could be used to shape a couple of Fimo legs before the plaster broke. Yes, plaster it is not only inflexible, but also brittle, not an ideal material for Pinky purposes.
Here one half of plaster mold has been removed from the clay with the original legs. Notice the two knobs that is supposed to align the two halfs of the mold.
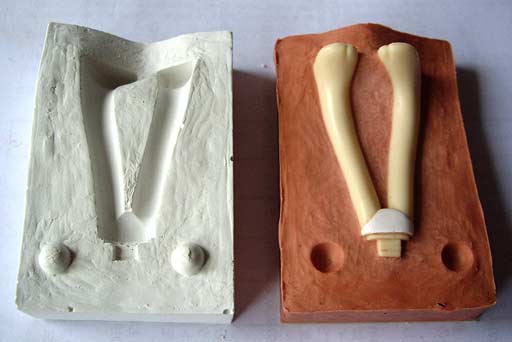
When making the leg copies, I pushed the soft clay into the plaster mold, pressed down with the other half of the mold, removed the extra clay and repeated the procedure a couple of times until the copy fitted into the mold. The following pictures illustrate the procedure. Notice that the "knobs" are no more, I used too little vaseline when casting the second half of the mold.
* When casting plaster on plaster, or silicon on silicon, make sure you use enough of a separating agent such as vaseline.

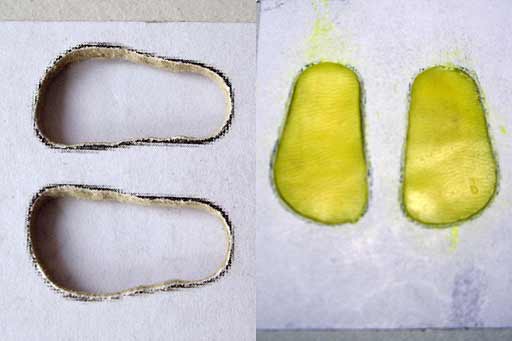
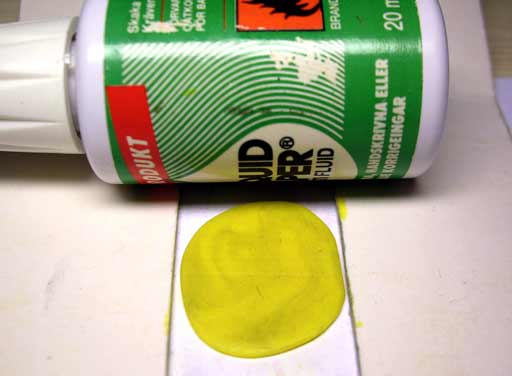
For the next step I had figured out that I needed a foundation for the feet and shoes. I started with an image of the original Crocs and reshaped this to Pinky proportions in Photoshop; their feet are slightly chubby, you know. A printout was glued to a thick piece of cardboard, the black parts were cut out and the holes filled with yellow clay. The soft uncured legs with feet were placed on the soles in the holes.
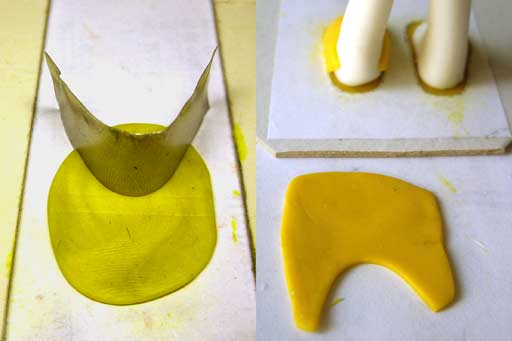
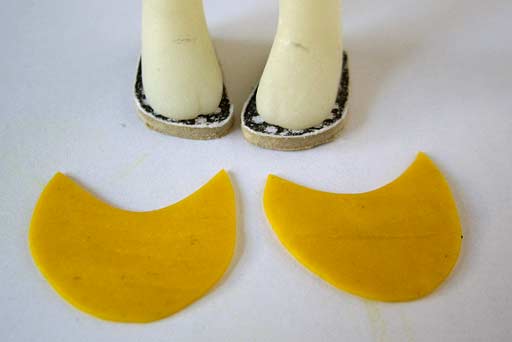
For the next step i needed thin sheets of clay for the upper part (vamp) of the shoes. The image show a simple way of making an even sheet. Mangle a lump of clay between two pieces of cardboard. The clay may stick to the “mangle” but otherwise it works well.
I gave the two sheets similar shapes around the ankle by cutting out a shape with a thin metal foil that I cut from a common heating candle.
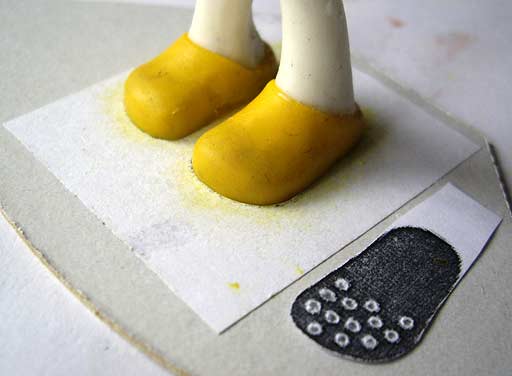
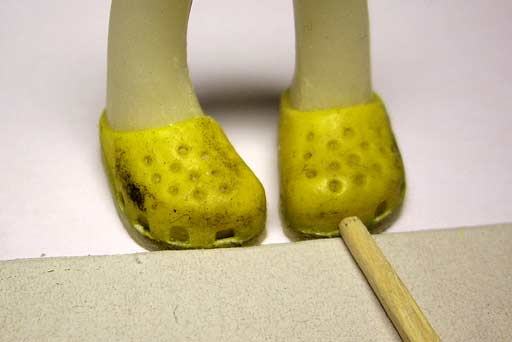
After adding some clay around the heel I shaped the shoe with my fingers and some plastic modelers tools. The shoe looks quite nice here, I think, but the soft leg has become rather jelly like. The next picture also shows the stencil that I used for making the holes in the top of the shoe.
The many holes on the upper part had to be placed with some precision which ruled out my shaky free hand. I brought a Crocs web image into Photoshop and drew a silhouette with the holes on a new layer. After adjusting this to Pinky size and proportions I printed several copies with slightly different width. The most suitable one was cut out and used after I had drilled through all the holes with a 1mm drill. The paper stencil was soked in water and placed on the shoe. I then pushed through the paper holes with a 0.7mm pencil lead tip. This almost worked, ordinary copy paper is a lot thicker and resilient than you may think. In later attempts, I used a needle to mark the places for the holes and made the indentations in the clay after removing the paper.
To give the legs back their proper shape I placed them in the plaster mold before baking the completed model. The shoes obviusly did not fit inside the mold so the lower part of this had to be removed. The whole idea was rather poor and my using a too high temperature in the oven did not help either. The result was pretty awful.
Back to the drawing board. It was rather obvious that I had to bake the legs before modelling the shoes over the feet so that was what I did next. I then reversed the cardboard process, cutting out soles in thick cardboard that I glued to the feet with a drop of Super Glue.
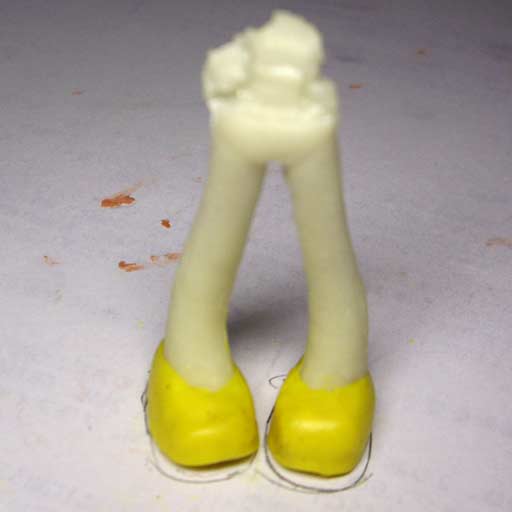
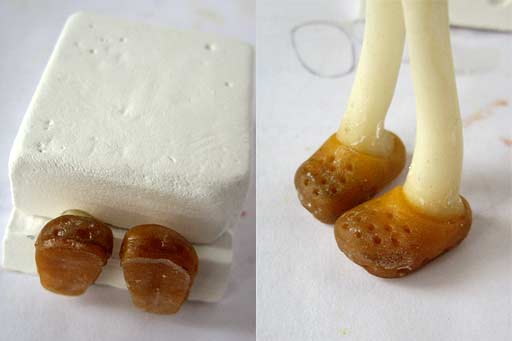
The upper shoes were modeled as outlined above. The top holes were added and then the holes along the edge of the shoe. For this I gave the tip of a tooth pick a semicircular form that I pressed into the soft clay. Here you recognize my point about using clean hands, the yellow clay has become rather smudged in places.
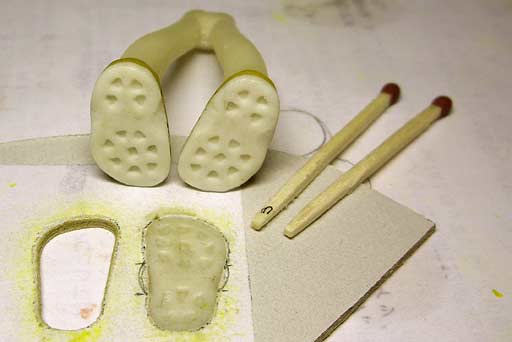
The half-finished shoes were hardened in the oven before applying the sole. I used white clay for contrast, mangling it between two pieces of the thicker cardboard. After placing the feet on the clay I removed the clay around the feet with a knife. Since I wanted a pattern in the sole, I put some clay in the old stencil and shaped a few match ends before punching indentations in the clay. You can see the result in the image. After baking the feet again, I filed away a little of the sole on the sides and rounded the edges.
* It is possible to build up a model with additional clay even after baking part of it with heat. Use different colors for the clay.
* Matches and toothpicks are cheap household items that are easy to shape into useful modelling tools.
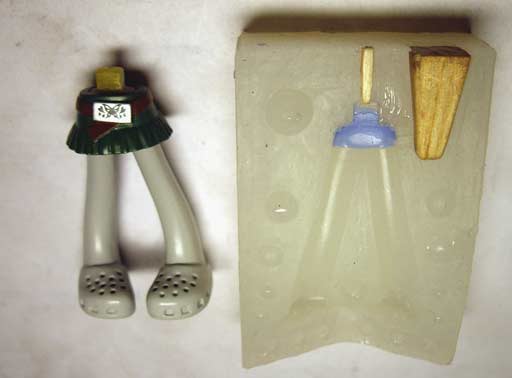
The finished legs were painted with fine gray primer that revealed all uneven points. These were fixed with Tamiya Basic Putty and more primer. The legs were then placed in the red clay bed again. Using the same clay for all castings saved a lot of work. I was very careful when removing the model from the clay, not wanting to destroy it.

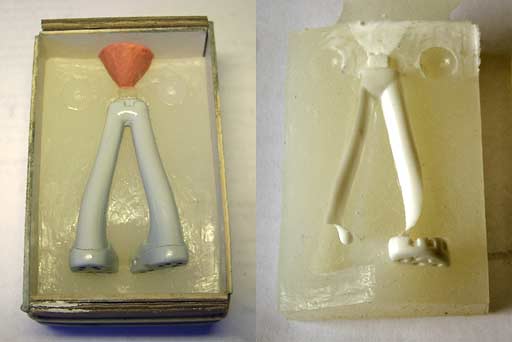
Here is the first silicon mold using the semitransparent Smooth-Sil 920 that mixes A and B parts 50/50. Most other silicons use about 2% of one part by weight which really requires a precision electronic scale to get right. Still only two knobs though...

After placing the model in the first half of the mold this was covered with a separating agent and an inlet was made from clay. After removing the clay and the model the mold was ready for the first casting trial using the polyurethane Smooth-Cast 300. Well, anyone could have told me that it would not work. The air inside the mold simply had no way to go when I poured in the liquid plastic.
Cutting air channels in the sides of the mold improved things a bit but these were not perfect as they were situated just below the inlet. Back to the drawing board again. A new inlet was added to the pelvic part of the legs and an air vent to the top of the waist peg. I also added some more knobs between the mold halves. The second pic shows the complete mold between two pieces of cardboard held together with rubber bands.
Now this is beginning to look useful but there are still some issues to address.
Many of the small holes and indentations in the trial cast were filled with plastic since air bubbles had prevented the thick silicon to flow into all parts of the model. So I hade to make yet another mold, first putting silicon in the fine details with the help of a tooth pick. As you can see, I have added several more knobs to this mold.
That problem solved, I was horrified to notice that the skirt of the series 5 Pinky did not fit my casts. The new clothes were simply too small. It took a good deal of filing to fit them on my model. I tried to adapt the existing silicon mold to the slimmer model with the help of some blue silicon putty. That was not a good idea, other parts of the soft mold expanded, resulting in a poor fit between the two halves.
* Silicon molds are flexible!
The next mold should have been the final one but it suffred from a few large air bubble defects that I tried to fix with blue silicon again. Besides, I had smeared too much of the separating agent on the model, this was reflected in the finished mold, especially along the separating lines.
* Use only a minimum amount of seperating agent on the model, spray it with liquid silicone and wipe off any excess with cotton tops.
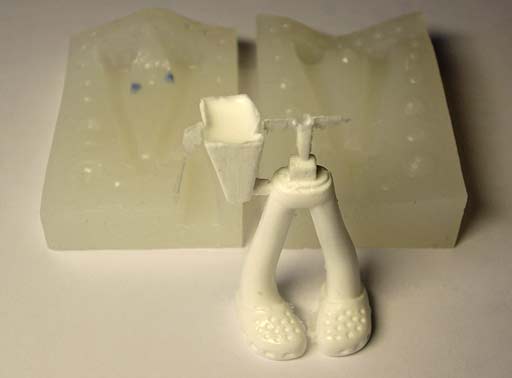
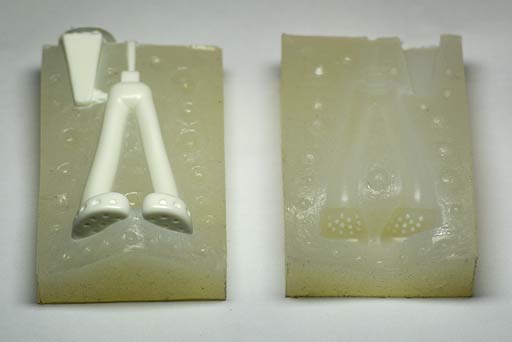
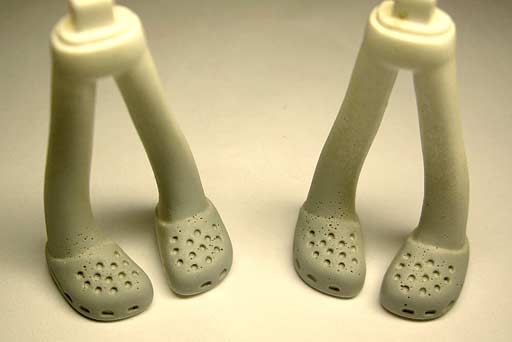
So I made yet another mold with many knobs and a clean model. I think this is the one that I am using now, but must confess that I have lost count of them along the way. There is too little silicon around the model, especially under the feet and there should have been more knobs between the legs. As a result, the casts are often uneven where the mold halves meet, and require filing, sandpapering and puttying to become nice and even.
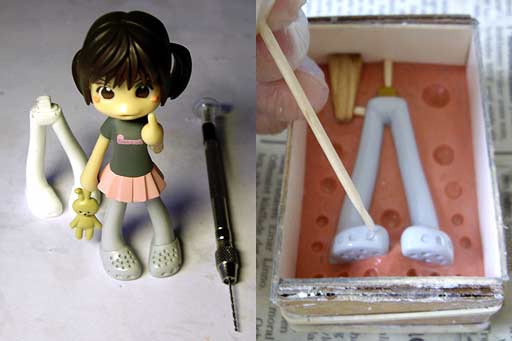
My toil resulted not only in many unusuable molds, but also produced several plastic prototypes that could be used for trying out putty, primer and paints. Here are Yoshiko in her Pink shoes and some of the prototypes behind a newly casted pair of legs and the original pair to the right.

Casting had its own problems, one being tiny air bubbles created by shaking the liquids. Both A and B plastic compunds must be thoroughly shaken and mixed before casting, otherwise the polyurethane will become translucent rather than white, as well as soft and sticky. However, the shaking produces bubbles, sigh. I now shake well before casting, after a while slowly turn the bottles upside down several times, and finally carefully stir the liquids with a wooden stick before measuring out and mixing them.
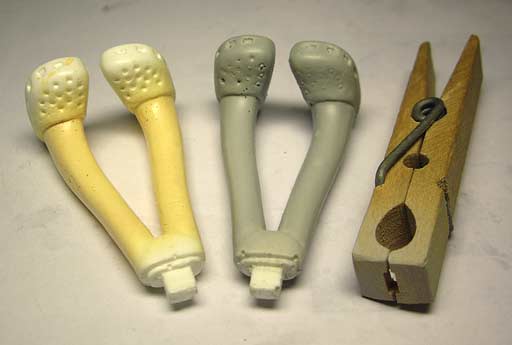
Two of the prototypes, where the gray one shows how the small holes in the shoe are all filled with plastic. The better ones were drilled up and subsequently painted for display purposes. The clothes pin was modified to hold the tab of the legs during painting.
Long before the painting started, I made silicon casts of the legs and the mold that later could serve as masks during the painting. The blue silicon bits had to be large and solid enough to keep their form when held around the legs being painted. I had to put some red clay on the cast to support it when making the opposite side.
Much later I realized that it would have been much easier to make the blue casts from the finished silicon molds instead.

Four legs showing the painting process; unpainted (but puttied and primed) cast, legs in skin color, panties (and shoes) painted white, and shoes painted pink. Lastly, the whole piece is covered with semigloss varnish.

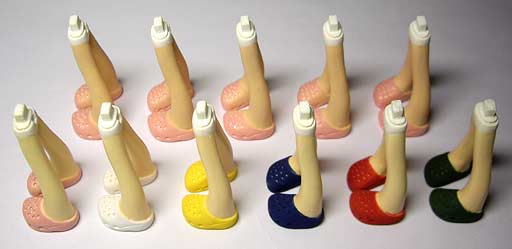
The final picture shows six rainbow colored prototypes and the first production batch in pink.
Materials
Both silicone and polyurethane comes from Smooth-On in the US. You can read more about all their products on their HP. I bought their products from the Dutch supplier FormX that has an online shop called aff-online.
Smooth-Sil 320 is a colorless, semitransparent silicone that has the advantage of 1A:1B mixing of the two components where most other silicones require the precise measurement of a very small amount of hardener that is added to the silicone proper. A disadvantage may be that the the B-component is very thick and has to be stirred thoroughly before mixing with the A-part. This is hard work that easily introduces a lot of air bubbles into the finished material. After a while the silicon becomes so thick as to be unusuable.
Smooth-Cast 300 is a two component polyurethane that also uses equal amounts of the A- and B-parts. Both have to be stirred and then mixed before pouring into the mold. This process can also introduce air bubbles into the cast. I try to avoid shaking the canisters, but rather carefully stir the contents with a stick before measuring out the required amounts and mixing these. The pot life of #300 is very short, on the order of 3 minutes, so I chose to try the #305 product instead that gives around 7 mins. However, this introduced zillions of air bubbles and stuck to the silicon mold which subsequently became damaged. Luckily, I had also purchased some series 325 plastic that looks more promising with fewer bubbles. This is in itself transparent but can easily be colored to a decent skin color!
The shelf life of especially the silicone is rather short after using some of the content so you should plan your work accordingly. It should be possible to use the silicone for a month or two but not much more, I think. The polyurethane fairs better in this aspect, it is possible to draw from the same batch even after six months.
Addendum: The Smooth-Sil I have left is now useless. I am now using the more easy flowing OOMOO 30 silicon but that introduces new problems as it sticks easily to the model and the LEGO form. Careful application of a separating agent such as vaseline or SilkaPast is essential. As mentioned above, I tried a new supply of Smooth-Cast 305 but experienced many air bubbles in the finished casts. Microscopic bubbles in the liquid plastic expand inside the mold when the plastic cures at high temperature – as much as 100 degrees Centigrade! It is probably the heat that damages the silicon mold. Application of a silicon release agent before casting may prolong the life of the mold.
Thank you for your patience and good luck with your own modeling projects!
Links
European reseller of Smooth-On products FormX
Maker of casting materials Smooth-On
Inga’s Pinky info and forum! All Your Cute Are Belong To Us
Lots of info in Clockwork Orange’s Pinky Page
The Milk Tea Pinky Card Translation Project
Alice’s Pinky pages Let's Go to Pinky:St!
Kanayasan (Japanese) is BABYsue.
Pinky’s home (Japanese) VANCE PROJECT
News and links from RuiRui (Japanese) How to get to Pinky Street?
All Pinky with details (Japanese) Pinky table view
Pinky mug shots with data (Japanese) Pink:st’Street
Instant*Bit Pinky Icons
Shuichi Ono’s (Japanese) Pinky Icons
Make your own badges with this My Can Badge
Or [in Sweden] order it from Knapp.nu
Everytime, everywhere choice is your own.