
Pinky Street
Pinky:st Series 1 & 1APinky:st Series 1B & 2B
Pinky:st Series 2 & 2A
Pinky:st Series 3 & 3A
Pinky:st Series 4 & 4A
Pinky:st Series 5 & 5A
Pinky:st Series 6
Pinky:st Series 7
Pinky:st Series 8
Pinky:st Series 9
Pinky:cos Rei & Asuka
Pinky:cos Animate
Go! Go! Pinky Street!
Acchi Kocchi Pinky:ska
Arcueid Pinky
Pinky:st. in Town
Pinky: Show Time!
Pinky Super Lovers
Wonder Festival Pinky
Gunslinger Girl
Space Invaders
GoFa Party Pinky
Pentax Cameras
*istDS*istDS2
*istDL
*istDL2
K10D/20D
K100/200D
K2000/K-m
K-x
Optio A10/20/30/40
Pentax Lenses
SMC-DA 40 f/2.8 LESMC-A 50 f/1.4
SMC-A 24 f/2.8
FA 43mm f/1.9 Limited
DA 21mm F3.2AL Limited
FA 31/1.8 AL ED Limited
FA F1.8 77mm Limited
Other Lenses
Zenitar 16mm f/2.8 FEPeleng 8mm f/3.5 FE
Stuff
Refconverter-A
![]()
![]()
![]()
![]()
![]()
![]()

MacTidingsNU » Pinky & Pentax » Koroko Sitting Legs
Updated 07-12-01
Email:
Pinky Projects
The Koroko Shoes
The Sitting Legs
Get the shoes in the shop!
Coming Up
Series 11
Koroko Sitting Legs
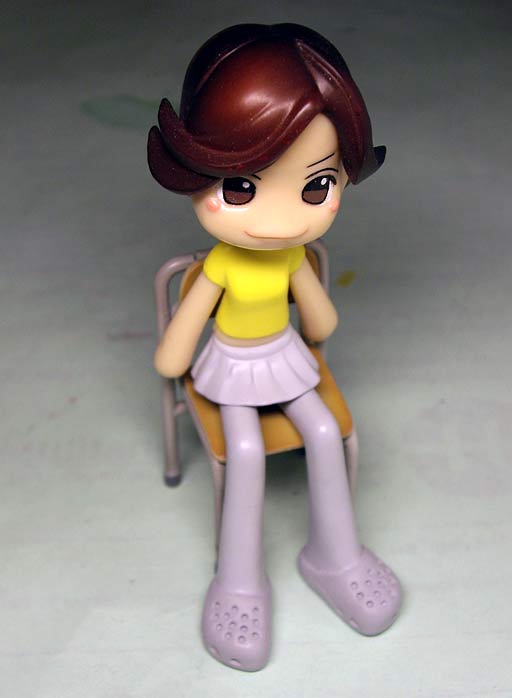
With the standing legs safely in silicon for duplication as required, it was time to consider the poor girls obvious need of sitting down now and then. Some of them still attend school and would like to sit at their desks.
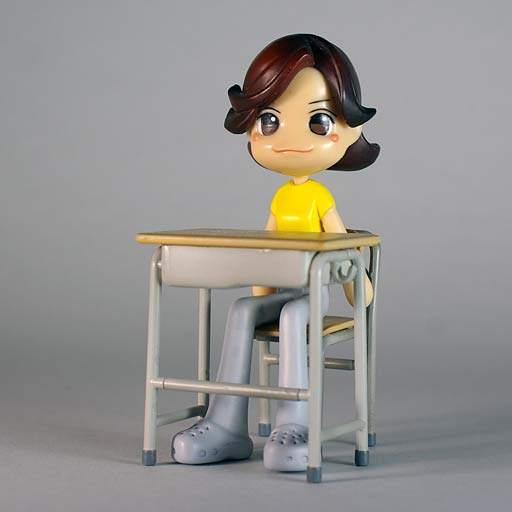
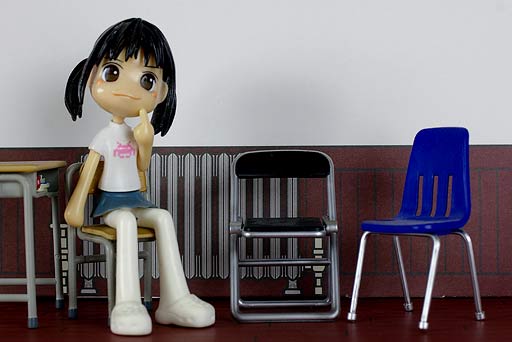
Naturally, I started the sitting legs project from the standing model, cutting up several copies of those, and gluing the parts together again at crazy angels with epoxy putty. First things first however, lets have a look at the requirements. The picture shows some of the Re-Ment chairs that will fit Pinky. My legs must fit the elementary school chair in the first place but should also work with the blue chair from the Little Café.
I started with the feet and ankles that needed a different angle. Using my tiny Tamiya Japanese saw, I separated the feet from the legs and glued them temporarily to a couple of clothespins. The legs were reattached with Tamiya epoxy putty. I used my Dremel tool to grind off most of the excess putty and then sanded down the rest with the 3M sanding foam.
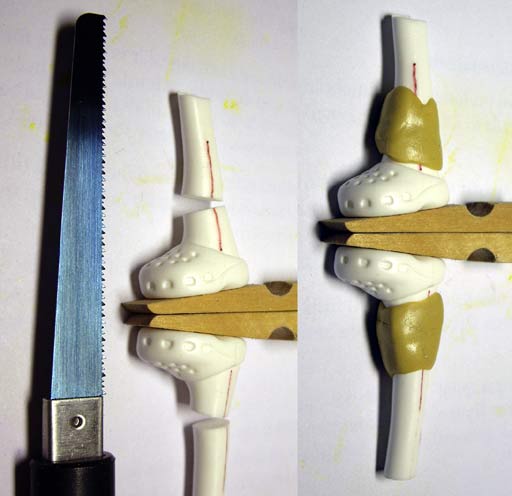
* When joining plastic parts with epoxy, make the surfaces as large as possible with a saw-tooth pattern or similar. The straight joints that I used here (and in the knees) easily break apart (they did). For example, use a small triangular file to cut grooves into the surfaces.
Next, I sawed off the pelvis from the upper legs and joined the two again at a 90 degree angle. After removing the unneeded putty, it was time to attach the lower legs and feet to the uppers.
To align the legs properly, I had devised a custom clamp, using two pieces of cardboard and a clothespin. This turned out very well (I applied liquid latex masking solution to the cardboard for a better grip).
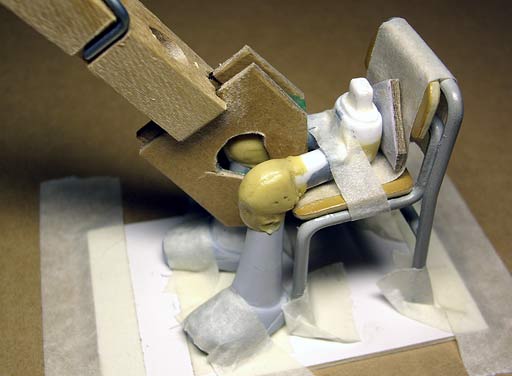
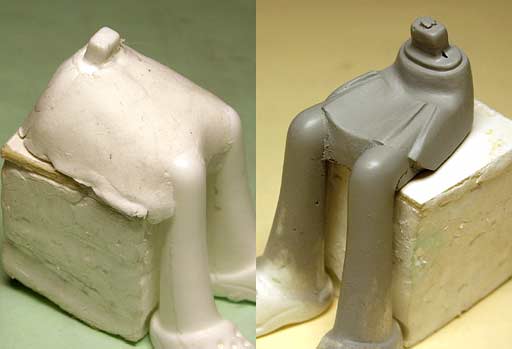
Here are the finished legs after some grinding and sanding of the knees. The tape on the chair was actually applied to create a nice profile for the pelvis and to prevent the epoxy from adhering to the chair.
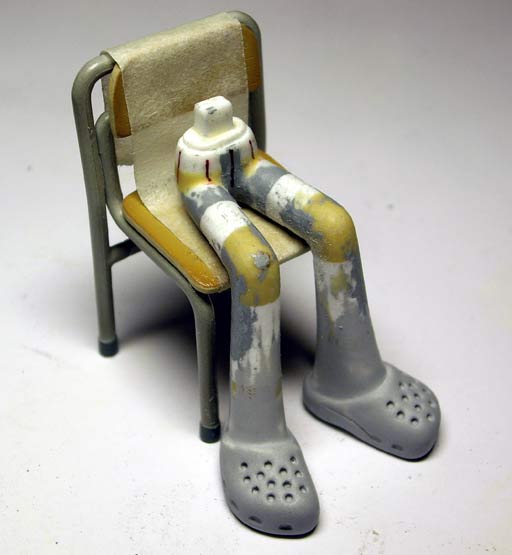
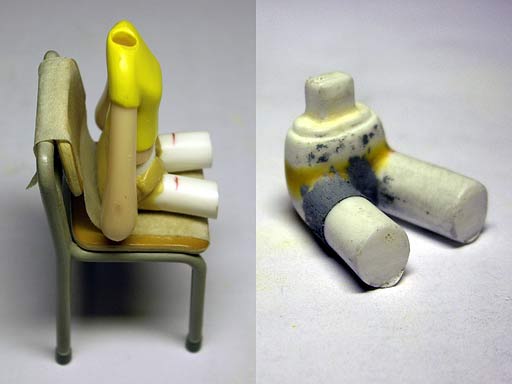
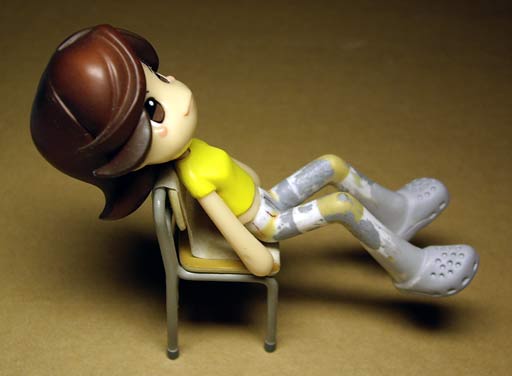
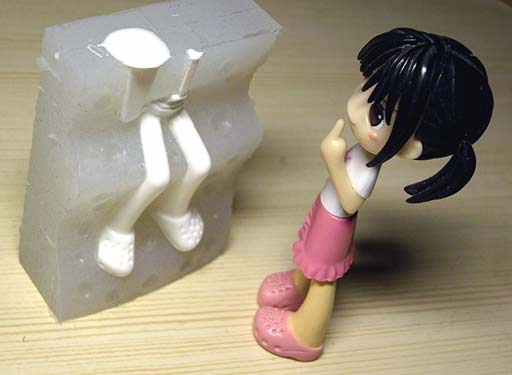
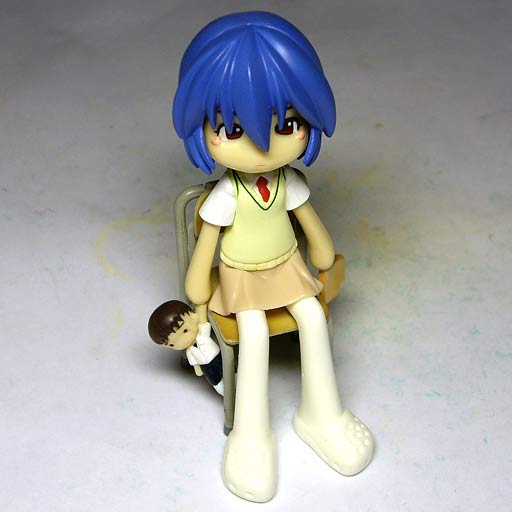
Finally, it was time to test the sitting legs with the Yoshiko upper body. As is obvious from the photo, this did not work as the poor girl fell backwards. I had got the center of gravity too far back. Back to the drawing board again.
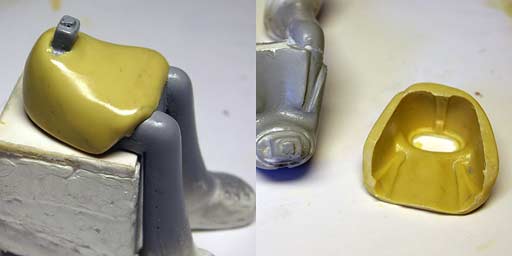
The large head and heavy rear hair piece requires a forward leaning pose. I balanced the upper body body on a piece of plasteline to find the right angle. The tiny saw was used again to separate the top pelvis from the rest, after which it was epoxied back at the required angle. Yoshiko could now sit but I had managed to attach the top with a slight rotation and a sideways shift which required a second sawing/gluing procedure to fix.

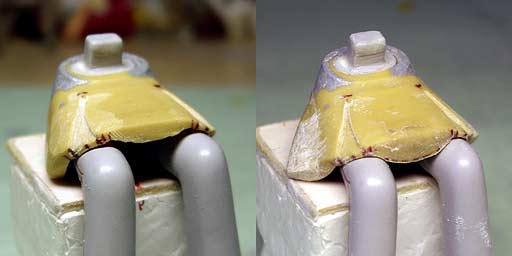
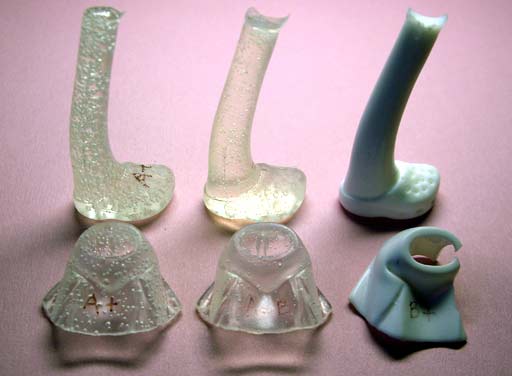
With the main anatomy finally correct, the legs were finished with Tamiya basic putty and a lot of sanding. I tried to add a pair of pants with a thin layer of putty (see right thigh above), it will be interesting to see how this comes out after painting.
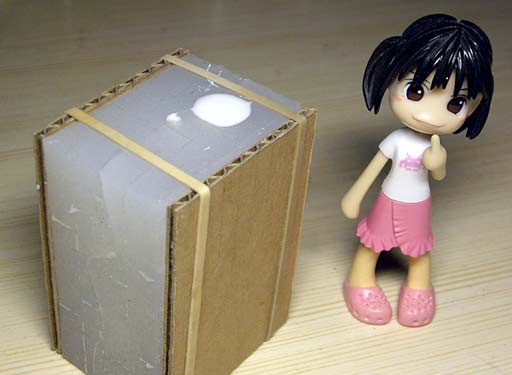
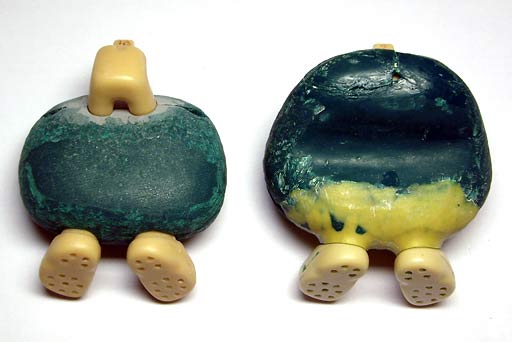
After the usual sprays of gray primer it was time to bed the legs in clay for the making of the silicon form. After some calculation, I decided on placing the model as flat as possible in the clay, adjusting this to the sharp angles of the model. I used the same inlet and vent as in the standing legs mold and luckily this turned out to work fine.
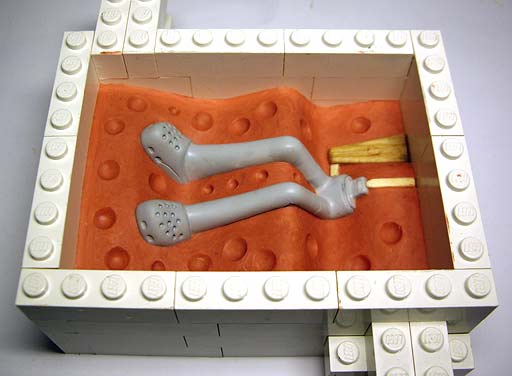
This time I used Lego blocks rather than cardboard for the mold casing. It looks as if I should have bought some half sized blocks too, however, I later realised that the blocks can be arranged in a way that makes this unnecessary.
* You will find it hard to find simple blocks like these in the toy shops that only carry the fancy models these days. Buy them from LEGO online.
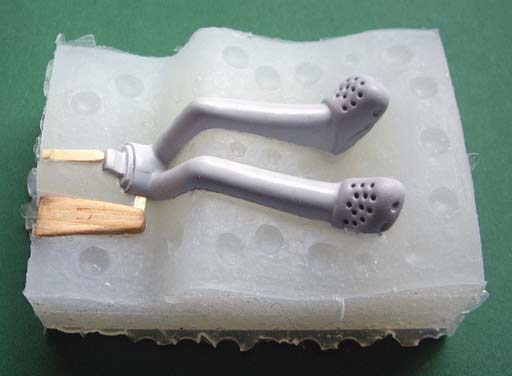
As before, I applied silicon to the holes in the model with a tooth pick. I also had problems with the air bubbles created by mixing the silicon. The larger ones tend to float to the surface, but some small ones stick to the model. It might be possible to get around this by pouring only enough silicon to cover the model at first, pricking the bubbles with a tooth pick, and then pour the rest of the silicon.
With some good casts finished, I was ready to create a skirt for the sitting legs. I decided to do a simple skirt that goes on top of the waistline, just like ordinary Pinky skirts.
I started by evening out the area around the pelvis and between the legs using Mr. Clay. This is very soft, easy to shape and dries reasonably fast without heating. It quickly becomes smudged though, and sticks poorly, even to itself (softening it with water should help, though). So when subsequently shaping the inside of the skirt, I decided to try SSP-HG putty insted. This is basically Super Glue with a filler that adheres very well to almost any surface. It hardens quickly and is very easy to file and sand.
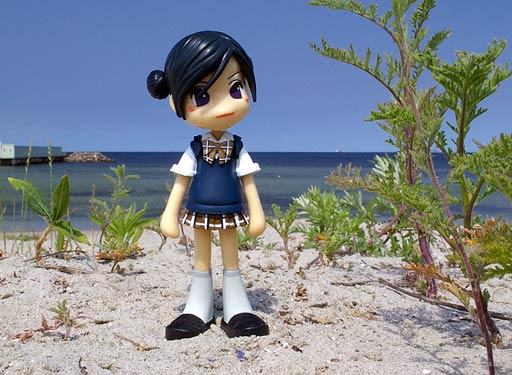
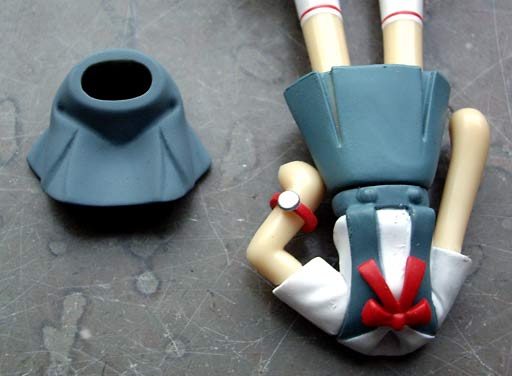
At this point I happened to take a good look at the picture of Kokoro at the beach. Oh dear, her sweater goes down over the skirt and probably will not fit over my planned skirt combo. Indeed, it won't even fit the bare legs, it is simply to long. I guess i could have made the pelvic portion longer with a higher waistline but that's out of the question now (if I make another set with different shoes I will keep this in mind :-). My legs are just fine, it is the sweater that's too long, as it was made for a standing pose. I will try to lower the skirt in the lap and just accept that the top won't go completely down over the tab. If required, the sweater can be modified slightly after heating it in hot water.
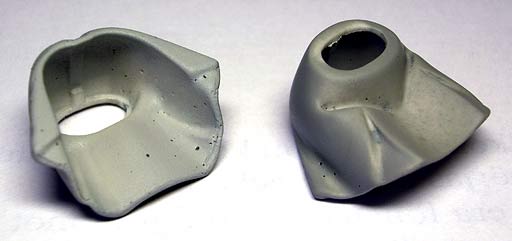
With the basic shape of the skirt ready as a model of its inside, I created the skirt model with Tamiya epoxy putty after spraying the model with silicon release agent. Regrettably, this was not enough as I hade problems removing the epoxy. Pieces fell off the edge as I pryed on it with a screw driver and when it finally came off it had cracked too. That was quickly repaired with Super Glue and the edges patched with more epoxy.
* Try to use enough epoxy putty from the beginning, although it is possible to add more later, this will leave a separating line that shows up when shaping the putty, small parts may even break loose, and the joint may require hiding with Tamiya putty.
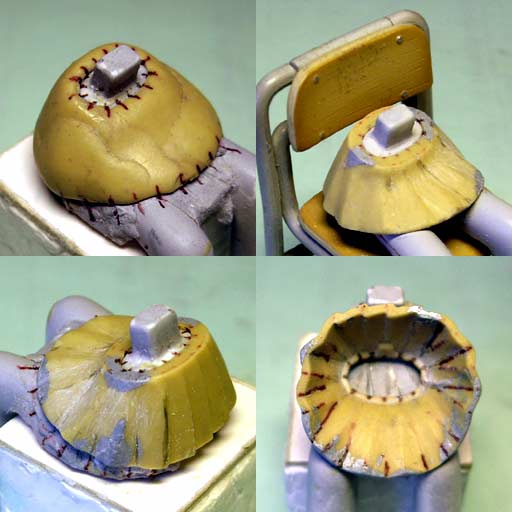
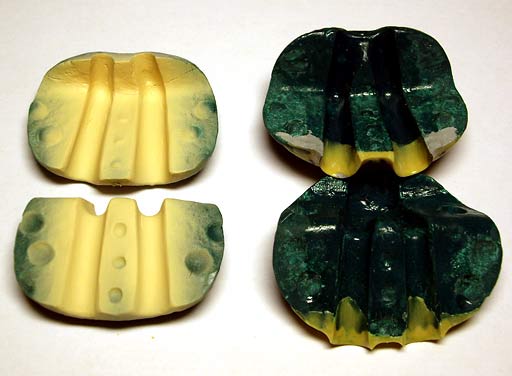
Next, I repaired and smoothed the inside of the skirt and then filed down the top to its required shape. The length of the skirt was measured out around its hem that was then trimmed as necessary. After transfering the markings on the inside to the edges, I began the hard work of shaping the 14 folds on the outside. The convex surface of the back and sides was easy, the concave forms of the front much more difficult.
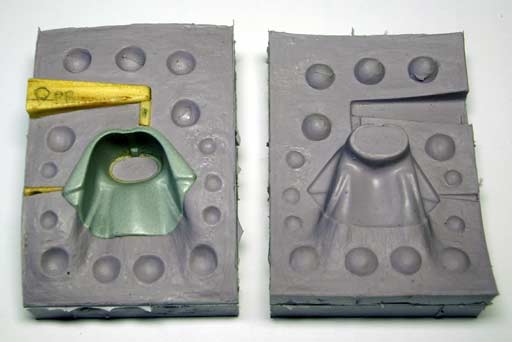
The finishing touch was made with a scraper that I fashioned from a scalpel. After blunting the cutting edge with a Dremel grinding wheel I ground the opposite egde to create a tool with a small rounding at the corner. The finished skirt was primed and then subject to the usual clay bedding and subsequent casting, this time using the easy flowing OOMOO silicon.
An early cast showing the inlet funnel and air vent to the left of the finished skirt.
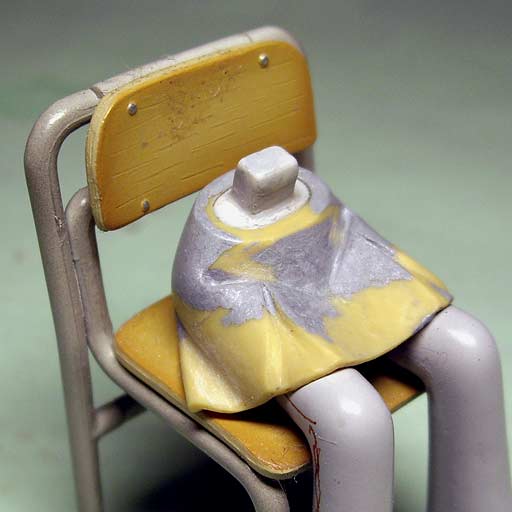
Yoshiko looks very pleased when she gets the chance to try the new skirt.
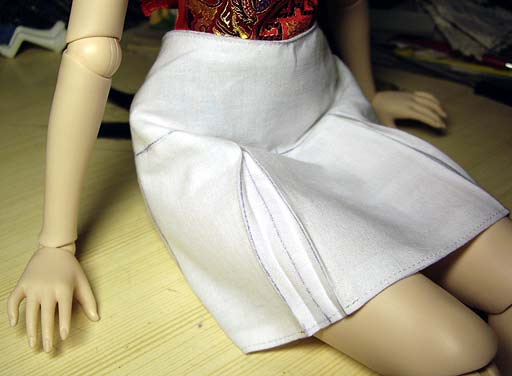
My 60cm BJD has a pleated skirt that I studied to get an idea of how the folds would look when seated. The Pinky version is not perfect but has some features from the real thing. The big doll also got a custom skirt made after the new EVA Pinky gray skirt. This is longer and folds in a complicated way when my Candy sits.
Yes, I dediced to make a second skirt for the new Pinky in gray school uniforms. As with the pleated skirt, I used Mr. Clay to build a base for the inside of the skirt over a pair of casted legs.
After trimming away the excess clay the finished model was used to form the epoxy base for the skirt. This time I smeared silicon paste on the model and the epoxy came off intact with some coaxing against the slippery silicon.
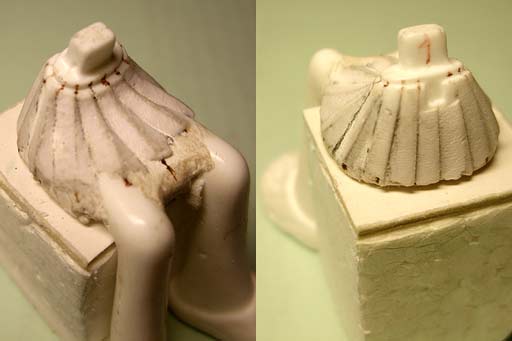
As with the first skirt, I started with the waistline that had to fit the legs. After removing some unneeded putty, I shaped the three grooves that will be pleats in the skirt. At this point it became obvious that the part between the knees had to be lower and that I had used too little epoxy at the sides. The second photo shows how more epoxy was added.
Now is perhaps the time to comment on the drudgery of work like this. You start out with a reasonably good idea of how the finished custom will look, but pretty soon despair hits hard as you seem to get nowhere, even after a week of hard work. That's when you need a lot of patience and faith in your own capacity. Just keep toiling and eventually the result will be worth the effort. If possible, start your work in a way that will quickly lead to some tangible result. If your custom should fit together with something else, then it's obviously best to make the joining part first. Then go on with significant features like the pleats on my skirt, as these will dictate how the other parts will go. Soon, you will be encouraged by the almost finished details and can continue into the unknown, perhaps even making up new neat features along the way.

Getting the folds of the second skirt to look natural was not easy but I was much helped by the BJD model skirt. Although several configurations were possible, I choose one that looked good and was reasonably easy to model. I used a tooth pick with a rounded tip to help shape the narrow grooves in the model that were partly built up with Tamiya putty.
* Tamiya basic putty is a bit soft and can often be finely adjusted with a hard object that is pushed against the surface.
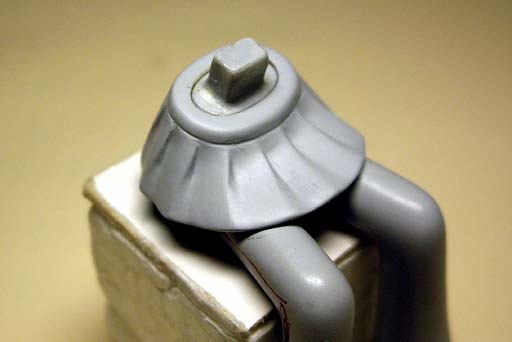
As before the almost finished skirt was sprayed with Tamiya gray primer which revealed a number of uneven places that were fixed with putty. After another round (or two) of primer and putty the skirt was ready for a final coat of light gray primer surfacer.
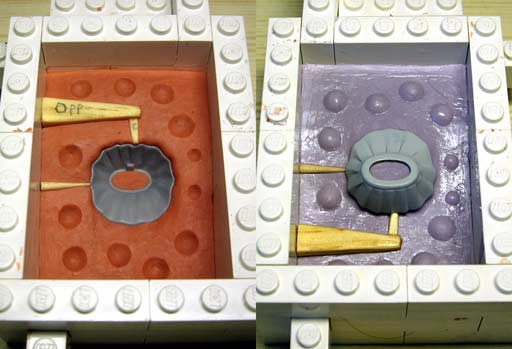
Making silicon molds of the models required bedding these in clay with suitable artifacts added for inlet and vent. When the time came for casting the molds, I found that the old silicon on hand was almost unusuable. In addition the trial casts featured many air bubbles so I decided to go for another material with lower viscosity – OOMOO silicon, also from Smooth-On. This comes in two variants with 15 or 30 minutes of pot life. I choose the OOMOO 30 which should give ample time to fill the molds.
The new silicon also requires equal parts of A and B compounds. The almost liquid blue B part has to be stirred before use while no such recommendation is made for the reddish and thick flowing A part. The resulting lavender colored mixture flows easily into the mold and it is reassuring to see the air bubbles quickly rise to the surface and disappear!
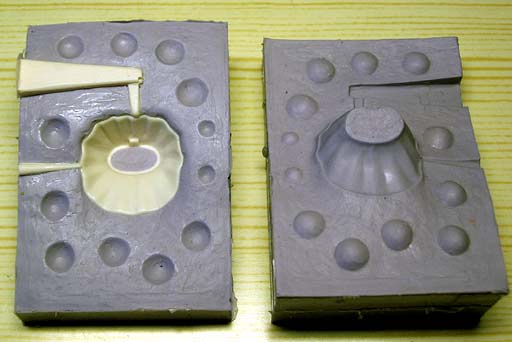
However, I have since noticed a troublesome feature of OOMOO that was not present with Smooth-Sil – OOMOO silicon tends to stick to the model and to the walls of the LEGO container. Simply spraying with a release agent was not enough, I had to push Silkapast (vaseline should probably do too) into the tiny holes of the shoes, and cover the legs and the form with this too, spraying release on top of this for good measure. This worked but I hade to discard several poor molds before getting this far.
A quick look at the second generation EVA Pinky prototypes revealed that they have a new sweater that goes down over the top of the skirt. Would this fit my skirt? There was no way to know until the launch, of course, but if I made sure that my skirt wasn't larger than the original, it might work (it did, please see below :-).
Although the skirts are easy to paint, mixing the right color to match that of the EVA Pinky skirt has not been easy. This color can be called Air Force Blue, Shadow Blue, or Steel Blue. Starting off by mixing two similar field blues, I added a bit of blue and green by sight, lightening the dark tone with white. The left skirt is close but a quick comparison in Photoshop reveals that is has too much red so I added a bit more green and blue to it.
Painting the shoes and the pants requires masks that I so far have made from silicon putty. This is easy to work with but somewhat fragile (and expensive). It is flexible and easily adapt to the exact form of the legs, and it does not shafe at the newly applied skin paint on the legs. Fine details are difficult to make, however, and quickly wear out.
For the new legs I decided to try new masks made from FIMO clay. Even when baked, this is rather soft and fine details will wear down fast. Consequently, I reinforced the critical edge with expoxy putty. All this required more work than the silicon masks.
Trying the new mask revealed several drawbacks. It is difficult to get the two halves of the mask to fit together properly and as they are rigid, they may not fit all casted legs equally well. The baked clay is a bit like crayons and may stain the skin colored legs, my choice of green clay was very bad. So this had to be painted to protect the legs. Since these fitted very close into the mask, the paint on the legs wore off in patches. This required more work to correct. The whole idea turned out to be a quirky one, only time will tell if it will work.
The description mentions that OOMOO silicon is less hardy than the Smooth-Sil that I have used before. It is recommended that a separating agent is used when casting PU resins in OOMOO molds to prolong their life. It is true that OOMOO is more fragile but it is too early to say whether this has any practical relevance. I used the seperating spray with the first casts and this has so far worked fine with no obvious damage to the molds.
Since I had problems with the Smooth-Cast 305 creating a lot of bubbles and worse – sticking to the mold – I made a little experiment (with the better 325 resin), deliberately misbalancing the mixture. With too much of the A part the 325 is transparent without added color – showing off the mass of bubbles inside very well! With too much of the B component is becomes white (the pot life is quite short). Interesting. I also tried the troublesome 305 with extra B component but this was not a hit as the result became jelly like!
The 325 resin can easily be colored before pouring the mixture into the mold. The flesh color is nice but not quite Pinky like. I thought that adding a small amount of yellow should be useful. Indeed, the yellow pigment was so strong that one drop to about 70 drops of flesh color was enough. The resulting color is very much like the Pinky skin. Please see Moe’s skirt above! This removes the need to paint the legs.
Materials
Both silicone and polyurethane comes from Smooth-On in the US. You can read more about all their products on their HP. I bought their products from the Dutch supplier FormX that has an online shop called aff-online.
Smooth-Sil 320 is a colorless, semitransparent silicone that has the advantage of 1A:1B mixing of the two components where most other silicones require the precise measurement of a very small amount of hardener that is added to the silicone proper. A disadvantage may be that the the B-component is very thick and has to be stirred thoroughly before mixing with the A-part. This is hard work that easily introduces a lot of air bubbles into the finished material. After some storage the silicon becomes so thick as to be unusuable.
Smooth-Cast 300 is a two component polyurethane that also uses equal amounts of the A- and B-parts. Both have to be stirred and then mixed before pouring into the mold. This process can also introduce air bubbles into the cast. I try to avoid shaking the canisters, but rather carefully stir the contents with a stick before measuring out the required amounts with a plastic spoon and mixing these. The pot life of #300 is very short, on the order of 3 minutes, so I chose to try the #305 product instead that gives around 7 mins. However, this introduced zillions of air bubbles and stuck to the silicon mold which subsequently became damaged. Luckily, I had also purchased some series 325 plastic that looks more promising with fewer bubbles. This is in itself transparent but can easily be colored to a decent skin color!
The shelf life of especially the silicone is rather short after using some of the content so you should plan your work accordingly. It should be possible to use the silicone for a month or two but not much more, I think. The polyurethane fairs better in this aspect, it is possible to draw from the same batch even after six months.
Addendum: The Smooth-Sil I have left is now useless. I am now using the more easy flowing OOMOO 30 silicon but that introduces new problems as it sticks easily to the model and the LEGO form. Careful application of a separating agent such as vaseline or SilkaPast is essential.
As mentioned above, I tried a new supply of Smooth-Cast 305 but experienced many air bubbles in the finished casts. Microscopic bubbles in the liquid plastic expand inside the mold when the plastic cures at high temperature – as much as 100 degrees Centigrade! It is probably the heat that damages the silicon mold. Application of a silicon release agent before casting may prolong the life of the mold.
Thank you for your patience and good luck with your own modeling projects!
Links
European reseller of Smooth-On products FormX
Maker of casting materials Smooth-On
Inga’s Pinky info and forum! All Your Cute Are Belong To Us
Lots of info in Clockwork Orange’s Pinky Page
The Milk Tea Pinky Card Translation Project
Alice’s Pinky pages Let's Go to Pinky:St!
Kanayasan (Japanese) is BABYsue.
Pinky’s home (Japanese) VANCE PROJECT
News and links from RuiRui (Japanese) How to get to Pinky Street?
All Pinky with details (Japanese) Pinky table view
Pinky mug shots with data (Japanese) Pink:st’Street
Instant*Bit Pinky Icons
Shuichi Ono’s (Japanese) Pinky Icons
Make your own badges with this My Can Badge
Or [in Sweden] order it from Knapp.nu
Lovely by any standard Pinky.